~o~o~o~o~o~o~o~o~o~o~o~o~o~o~o~o~o~o~o~o~o~o~o~o~o~o~o~o~o~o~o~o~o~o~o~o~
zz
—–zzzz—–
—–zzzzzz—–
—–zzzzzzzz—–
—–zzzzzzzzzz—–
—–zzzzzzzzzzzz—–
—–zz———-zz—– Temple of the Ocean King II
—-zzzz——–zzzz—- [0305]
–zzzzzz——zzzzzz–
zzzzzzzz—-zzzzzzzz
zzzzzzzzzz–zzzzzzzzzz
zzzzzzzzzzzzzzzzzzzzzzzz
————–
~o~o~o~o~o~o~o~o~o~o~o~o~o~o~o~o~o~o~o~o~o~o~o~o~o~o~o~o~o~o~o~o~o~o~o~o~
+——————————————————–+——————–+
|Temple of the Ocean King – Entrance | Mark List |
+——————————————————–+——————–+
|New Quest Item: Phantom Hourglass |
+——————————————————–+
Immediately after you enter, a cutscene will take place. Linebeck once again
proves himself to be a terrific coward, but Oshus arrives in time to dispel the
situation. Head to the north end of the room as Oshus instructs; use the
stairsets on the east or west ends of the room. There, Link will recieve the
Phantom Hourglass in another cutscene.
Head back down the stairs, and through the door on the north end of the room’s
first level.
+——————————————————–+——————–+
|Temple of the Ocean King – First Floor | Mark List |
+——————————————————–+ A: Floor Entrance |
This time, when you enter the first floor of the Temple, | F: Door of Power |
the Phantom Hourglass will flash onscreen, showing a ten +——————–+
minute timer. As Leaf will explain, this timer shows how much time you have
before the the cursed fog in the dungeon will begin to hurt you. Leaf also
points out the Door of Power, north of POINT A: FLOOR ENTRANCE. Mark this as
POINT F: DOOR OF POWER, and head for the Door. Tap it on the Touch Screen to
open it, then go up the stairs on the other side.


+——————————————————–+——————–+
|Temple of the Ocean King – Basement First Floor | Mark List |
+——————————————————–+ A: Floor Entrance |
Mark where you enter as POINT A: FLOOR ENTRANCE. Take a | B: Trap Switch 1 |
step forward, and a pair of Phantoms will appear. Leaf | C: Torch Puzzle |
will explain; to add to his thoughts, you can sneak by | D: Door Switch 1 |
the Phantoms by avoiding the yellow cone that represents +——————–+
their field of vision. And if one does happen to spot you, run as fast as you
can to the nearest safe zone.
Head for the safe zone to the east, and open up your Map. Look at the
southeast corner of the map; there is a square-shaped hallway here, patrolled
by one of the Phantoms. Draw a line around this hallway, representing the
Phantom’s path. Next, mark the northeast corner of the map as POINT B: TRAP
SWITCH 1. Lastly, mark the south-central part of the dungeon as POINT C: TORCH
PUZZLE.
Wait for the Southeast Phantom to reach the southwest corner of his patrol
path, then quickly run to POINT B: TRAP SWITCH 1. Strike the Trap Switch here,
and a torch will come to life near POINT C: TORCH PUZZLE. Run as fast as you
can to this point; if you timed it properly, then the Southeast Phantom should
be nowhere near POINT C: TORCH PUZZLE. Use the Boomerang to light the unlit
torch adjacent to the currently lit one. Go quickly; Trap Switch 1 has a
limited timer.

Solving the Torch Puzzle will remove the fire trap in the southwest corner of
the dungeon. Run here, and into the Safe Point at the dungeon’s southwest
corner. Open up your map to make a few more marks. First, mark the path of
the West Phantom; he slowly patrols the entire west hallway, going north to
south. Also, look for a small wall just to the west of POINT B: TRAP SWITCH 1.
Mark the west side of this wall as POINT D: DOOR SWITCH 1.
Now, wait for the West Phantom to reach the south point of his patrol path,
then start heading back north. Follow slowly in his wake, running into the
Safe Point stashed on the west-center part of the map when the opportunity
arises. Wait for the Phantom to return to the south end of his Patrol Path
again, then quickly run to POINT D: DOOR SWITCH 1.
Stand on the switch in the ground here to open the barrier on the northwest
side of the floor. Run there, to find a SMALL KEY in a small Safe Zone. Once
you have the SMALL KEY, return to POINT B: TRAP SWITCH 1, and go through the
locked door located there. Use the same tactics you used to avoid the Phantoms
before.
Once you’ve opened the locked door at POINT B, go down the stairs on the other
side.
+——————————————————–+——————–+
|Temple of the Ocean King – Basement Second Floor | Mark List |
+——————————————————–+ A: Floor Entrance |
Mark where you enter as POINT A: FLOOR ENTRANCE. There | B: Phantom Puzzles |
is a Phantom just to the west of you; mark him as POINT | C: Key Puzzle |
B: PHANTOM PUZZLE. The POINT B Phantom does not patrol; | D: Boomerang |
he stands motionless at his post, gazing down the | Puzzle 1 |
hallways to his west, south and east. Unfortunately, +——————–+
the Phantom is inconveniently posted directly in front of a Switch you need to
reach.
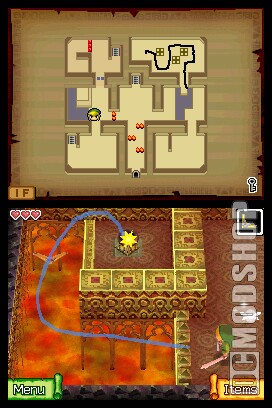
Wait until this Phantom is looking West or South, and then quickly run south
yourself. On the south end of the wall here, there is a Trap Switch. Activate
it to make a noise, attracting the attention of the Phantom. He should run
south down the west side of the wall, so run north up the east side of the wall
to avoid him. Run to his post and pull the lever before he returns. Head back
to the Safe Zone after you have pulled the lever, and wait for the Phantoms on
the floor to calm down before continuing.
There’s a second puzzle to be solved at POINT B: PHANTOM PUZZLES, this one
involving the Trap Switches. There are two total; one you’ve already
activated, the other is at the northwest end of POINT B: PHANTOM PUZZLES.
Activate the same one you activated before, and then head for the second in
same manner you used to reach the switch the Phantom once guarded. This makes
a SMALL KEY appear; mark this as POINT C: KEY PUZZLE.
The lever you pulled earllier opened a passage southwest of POINT B: PHANTOM
PUZZLE. Mark that area as POINT D: BOOMERANG PUZZLE 1, and then quickly run
down into that area when the POINT B Phantom is looking away.
On the west end of POINT D: BOOMERANG PUZZLE 1, there is a red potion. Break
it open near the Fire Trap to create a tiny Safe Zone. Stand in this Safe
Zone, then whip out your Boomerang. Draw a Flightpath south, across the Fire
Trap, and onto the Trap Switch on the other side. The Fire Trap will
deactivate.
Go to the southwest corner of the room, where there is a Safe Zone. Stand in
this Safe Zone, and watch the South Phantom to see his path. He slowly patrols
the entire south hallway, going east and west, and also the southern half of
the east hallway, going north and south. Draw this path for future reference.
Now, starting heading to the east part of the map, to POINT C: KEY PUZZLE.
Again, follow in the wake of the South Phantom, and duck into a safe zone near
POINT C when the opportunity arises. Once the South Phantom is headed back to
the south end of the room, look for a Floor Switch at POINT C. Stand on it to
lower a Spike Trap to the west; without leaving the Floor Switch, whip out the
Boomerang and draw a Flightpath over the spike trap, and onto the Small Key.
Release the Stylus to grab the Small Key.
Backtrack to POINT D: BOOMERANG PUZZLE 1, and use the Small Key to open the
locked door located there. Go down the stairs you find on the other side.
+——————————————————–+——————–+
|Temple of the Ocean King – Basement Third Floor | Mark List |
+——————————————————–+ A: Floor Entrance |
Mark where you enter as POINT A: FLOOR ENTRANCE. Next, | B: Triforce Puzzle |
sketch out the patrol paths of the Phantoms; one circles | C: Force Gem 1 |
the looping hallway in the northwest, and the other the | D: Force Gem 2 |
same in the southeast (apparently passing through two | E: Force Gem 3 |
sets of Spike Traps; this is normal). Northeast of +——————–+
where you enter, there is a huge Safe Zone; mark this as POINT B: TRIFORCE
PUZZLE. Run up there to take a quick look now.
You’ll find at POINT B a large diorama of the Triforce. A nearby stone tablet
gives the solution to the puzzle: place the Force Gems onto the pedestals to
open the barrier. There are three total, found in the small Safe Zones dotted
around the area. The first is in the northwest corner; mark this as POINT C:
FORCE GEM 1. The second is in the southeast corner; mark it as POIND D: FORCE
GEM 2. The third, and last, is behind a door in the southwest corner. Mark
this as POINT E: FORCE GEM 3.
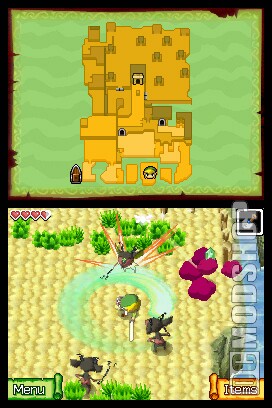
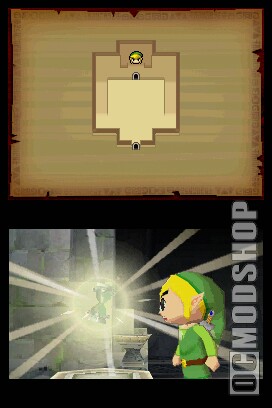
Head for POINT C: FORCE GEM 1 first. Inside a chest at POINT C, you’ll find
the first Force Gem. If you’ve played Battle Mode at all, then you’ll know
what to do here, but otherwise, it’ll take some explanation. Return with the
Force Gem to POINT B: TRIFORCE PUZZLE, and toss it onto one of the triangle
pedestals located there. As Leaf says, don’t be a hero; if you’re spotted by a
Phantom, dump the Gem and hoof if to the nearest Safe Zone. Return to claim
the Force Gem once the coast is clear.
Once you’ve set Force Gem 1 into the Triforce Pedestals, head for POINT D:
FORCE GEM 2. Don’t go along the east wall; there are traps there which will
attract the attention of the patrolling Phantoms. Instead, go to the south
wall, then east. Take the Force Gem from the chest at POINT D, and return it
to POINT B.
The third Force Gem is the trickiest. It’s behind a locked door at POINT E:
FORCE GEM 3, but one of the Phantoms carries the key (it’s clearly visible on
the map). Sneak up behind the Phantom, then nail it with the Boomerang. After
a brief moment of alarm, the Phantom will return to its patrol, leaving the
SMALL KEY lying on the floor. Pick it up, then head for POINT E: FORCE GEM 3.
Unlock the door at POINT E, open the chest to get the last Force Gem, then
carry it to POINT B. With all three Force Gems placed at POINT B, the barrier
will open, revealing a door. Go through this door.

+——————————————————–+——————–+
|Temple of the Ocean King – The Door of Wisdom | Mark List |
+——————————————————–+ A: Door of Wisdom |
|New Quest Item: Sea Chart (northwest region) +——————–+
+——————————————————–+
Directly in front of you as you enter is the Door of Wisdom; you can probably
guess that since you don’t have the Spirit of Wisdom, you won’t be going
through this door any time soon. Mark it as POINT A: DOOR OF WISDOM, then head
for the northwest corner of the room. There’s a chest here. Open it to get
the Sea Chart of the Northwest Region. Take it, then enter the portal which
appears to return to the surface.