
MISSION OBJECTIVES:
[ ] INFILTRATE THE FACTORY
[ ] ACQUIRE BUYER’S LIST
[ ] EXTRACT THROUGH THE LOADING BAY
OPPOSING OBJECTIVES:
[ ] NONE
OPPORTUNITY OBJECTIVES:
[ ] PROTECT THE CRATES
[ ] NEUTRALIZE THE GUARDS
[ ] RETRIEVE WEAPON SCHEMATICS
[ ] PLANT EXPLOSIVE CHARGES
———————————————————————————————————————————————-
As much as you’d like to not believe it, the first mission is actually a TRAINING mission. If you’ve played SC: Chaos Theory (the XBOX/PC versions), then everything feels just like deja vu.
+++ AREA: FROZEN CAVE +++
Welcome back, rogue agent. After the cutscene, do a 180 turn and enter the frozen cave. Halfway through the cave, you’ll see a guard behind a thin wall of ice. GRAB him and INTERROGATE him (or don’t) and then knock him out.
Walk past the overturned snowmobile to the dead end. Use the INIT DYNAMIC HOIST option to boost your partner to the top (he’ll grab Sam, so don’t panic!). As you make it towards the end of the cave, Lambert calls in and tells you to go BACK to the cave entrance. Do as he says.
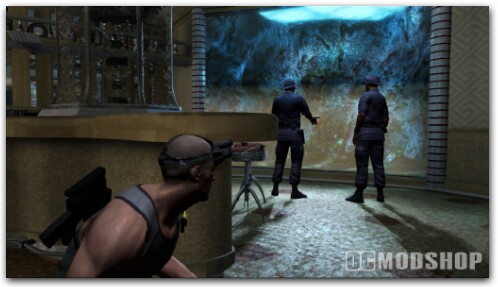
OBJECTIVE: NEUTRALIZE THE GUARDS
Near the cave entrance will be two guards. GRAB the first one when it’s clear and drag him into the cave. For the other guard, use a Sticky Shocker (it’s faster than waiting). Once both guards are down, go back to the cave and continue what you were doing.
As you enter the next area, you’ll see wooden scaffolding and a bright spotlight. You have the option to shoot out the light OR use the planks on top of the scaffolding. Whichever way you choose is the best.
As you exit the area, you’ll see more weapons crates. Grab the lone guard and knock him out (you can use the PLUNGE method, but it’ll count as a KILL). To enter the factory, take the pipelines or use the ladder to find a closed gate. To open the gate, enter the control room just near the ladder and use the OPEN option. Now enter the facility.
+++ AREA: THE FACTORY +++
Have your partner give you a BOOST over the gate. Now look above Sam to see a pipeline that you can shimmy on. Use the pipeline and quietly creep towards the guard and use a chokehold move to knock him out. Hide the body just to make sure.
Now stay hanging on the pipeline and continue creeping towards the end and Sam will climb over to the top. Shimmy all the way to the right side but DO NOT climb up yet. A guard will stop by (just because he has to). Wait for him to leave and then go ahead and climb up. Stay in the shadows and wait for him to come back. GRAB him and then knock him out.
At the end of the walkway is a CAMERA. Use the OCP on it and creep past it towards the ladder under the large pipes. STAY QUIET because there is another guard on the other side! Climb the ladder up, use the CUT MATERIAL and enter.
+++ AREA: INSIDE THE FACTORY +++
Just to Sam’s right is the water pressure valve. Use the TURN VALVE option to lower the water. Now climb down the nearby ladder and walk through the murky water to the other side to find a pipe. Climb the pipe up but do not jump over yet!
A technician will walk nearby and check the pipes. Let him finish and make sure he walks away. When it’s clear, jump over near the dark area and use the OCP on the lamppost above. Now walk around the pipes and GRAB him and knock him out (you can also use the pipeline above him if you want to look stylish). Do the same thing for his friend across the room. Now exit to the next area.
In the next area, there is a CAMERA. You can use the OCP or just simply shoot out the lights. Just down from where the camera is located are a set of lasers. Use the OCP on the middle and bottom lasers (don’t worry because the lasers won’t regenerate for a good minute). Pass through to the next room.
+++ AREA: THE TURBINE ROOM +++
OBJECTIVE: PLANT EXPLOSIVE CHARGE #1
There are three guards here. I suggest eliminating them just to be safe. Across the room you’ll see a set of computers with glowing green monitors. Next to the computers is a large metal control panel (it looks like a large server). Use the PLANT CHARGE option. Now head up the stairs and enter the next area.
+++ AREA: COMPUTER LAB +++
OBJECTIVE: OBTAIN THE WEAPON SCHEMATICS
After the cutscene, enter the lab. There is a sleeping guard, so be careful! Knock him out and then head to the large window (you can use the pipeline above him to use a chokehold, if you want). Use the EEV on any of the three computers and HACK it to gain the information needed.
Exit the room to a brightly lit hall. DO NOT HEAD THROUGH YET! There is a CAMERA watching the hall, so bust out the OCP and disable it or shoot out all the lights. Now exit this area.
+++ AREA: UPPER TURBINE ROOM +++
There are two guards here. There are three ways to get past here:
–You can simply whistle to distract them and knock them out (or walk by them unseen) –Jump over the railing and shimmy ALL the way to other side (whistle just near the second guard to get him away from the door)–Jump over the railing and GRAB and toss the guards over to the bottom (DEADLY!)
Use the PICK LOCK option to exit this area. Head down the hall and use the OPEN TRAPDOOR option next to the closed gate. As you climb down the ladder, it seems like you’re stuck. WHAT DO I DO NOW? Easy, put Sam’s back against the wall to the right of the stairs and he’ll squeeze and creep through the small space. SIMPLE.
+++ AREA: FACTORY ENTRANCE – UPPER FLOOR +++
In this next area is a metal walkway enclosed with a metal fence. Dispatch the two guards here using the GRAB method or by using the SPLIT JUMP attack. Either way works fine. Exit the walkway to a hall with three sets of separate lasers.
You can use the OCP on all of them or you can simply use the pipeline above to creep past them. It’s your choice. Now enter the next area.
+++ AREA: MAIN TURBINE ROOM #1 +++
OBJECTIVE: PLACE EXPLOSIVE CHARGE #2
There are two guards in front of you. Squeeze in between the large turbine tanks to Sam’s right and creep all the way to the other side. Dispatch the two guards in any way you want, just DO IT.
Now climb the ladder up to the top walkway and head to the other side to find another server to PLACE CHARGE. Now go to the switch with the red lights and activate it to open the door below. Take the nearby ladder down and exit the room.
+++ AREA: MAIN TURBINE ROOM #2 +++
There is a CAMERA just near the stairs, so disable it and head to the door downstairs. Enter the room to see a guard walking around with a flashlight. You can try to GRAB him and knock him out, but your best bet is to look up and use the pipeline for a chokehold.
Once he’s down, use the OCP on the nearby light above the door to the right to darken the area. Enter the door and head down the walkway and turn left to a set of large pipes. Squeeze and creep your way all the way to the end where you’ll find a pipe to climb. Climb the pipe to the top and shimmy to the one across from you and then slide down to the murky water below.
+++ AREA: MAIN TURBINE ROOM #3/BREAK ROOM +++
Cross the water to the other side to see a technician making lots of noise. You can either grab him from the water and drown him or use a simple knockout blow. Hide the body and exit the area. In the next hall, use the OCP on the nearby light.
As you turn the corner, you’ll see a guard go into the break room. Sneak past the room to the other side BUT WAIT! Use the OCP on the light to avoid the CAMERA and then exit.

+++ AREA: FURNACE ROOM +++
OBJECTIVE: PLANT EXPLOSIVE CHARGE #3
Do not worry about the all the various noises, you’re safe in this area. Climb the gate to Sam’s left all the way up. Shimmy to the left, climb up and take the ladder up. Walk up to the open metal door and wait for the furnace walkway to come back (or get on it if it’s there).
Ride it to the other side and exit. Take the nearby stairs and you’ll be above the control room (with the large ceiling fan on the roof). Jump down from the roof to the left side of the control room.
Use the PICK LOCK option and OPEN the door. You should be able to open the door and not distract the two guards inside. Carefully GRAB the first guy and drag him outside and knock him out. Do the same thing with the second guard. Also, across from the door is a set of steel girders. You can use the SPLIT JUMP maneuver here if you want, but I don’t recommend it. Once both guards are down, go to the server in the control room and PLANT CHARGE. Exit the area.
Before taking the stairs, shoot the light at the top of the room and climb up. Use the OCP on the light or on the CAMERA and exit.
+++ AREA: WORK ROOM/GARAGE +++
OBJECTIVE: ACQUIRE THE BUYER’S LIST
In this area are two guys hammering stuff in the area below. If you want to knock them out, do it. If not, enter the door just near where you came from. Enter the hall to see two lasers. Disable them and go up the stairs. Shoot the light at the corner to darken the area from the CAMERA. Now enter the next room and knockout the lone man inside. Now use the computer on the left side to complete the objective.
OBJECTIVE: EXTRACTION TIME
Time to get the hell outta dodge! Go back to the work room and use the DOOR CODE obtained from the previous room (7931) and exit.
Make your way through the garage by jumping over the large pipes and shooting out the rest of lights in the area. Dispatch the three remaining guards and then exit the room to EXTRACTION.
MISSION COMPLETE! Welcome to Splinter Cell: DOUBLE AGENT!

3 comments
if this walkthrough for the regular xbox why do you have 360 screenshots for it
thats not really a walk-thru
my bad. i didnt know there was more. you should make it more obvious. i almost missed it. its the smallest thing on the page.
Comments are closed.