

WEAPONS
BioShock is a First Person Shooter, so therefore you have a wide variety of weapons that you collect throughout the game. To use your weapons you must enter weapon mode by pressing RB. You can cycle through your weapons by pressing RB again, or bring up a radial selection menu by holding down the right bumper. Your weapons can also be upgraded and use different types of ammo – see the ammo and weapon upgrading sections for more details.
- WRENCH :: A la Prey, since a crowbar would just be ripping off Half-Life. Used to knock locks off doors, open grates, or club the living daylights out of splicers.
- REVOLVER :: Slow firing, but very accurage. Useful for taking out a camera or headshots.
- MACHINE GUN :: A Tomygun of this era, with a large 40 round clip. Takes normal, armor piercing and anti-personnel ammo.
- SHOTGUN :: This…. is my BOOMSTICK! Only four rounds per clip, but takes regular buckshot, explosive buchshot, and electrical buckshot.
- GRENADE LAUNCHER :: The FPS standard. Use this for boss fights. Fired frag grenades, proximity mines, and heat-seeking RPGs.
- CHEMICAL LAUNCHER :: Sprays several different types of chemicals at your enemies, such as napalm, liquid nitrogen, and electrical gel.
- CROSSBOW :: This powerful crossbos has a small clip size and slow rate of fire, but does massive damage. Also has a great zoom function.
- CAMERA :: Used for research, which eventually reveals how to damage a research subject.

CUSTOM AMMO
Each gun has several different types of ammunition it can use, including regular, anti-personnel, explosive, armor-piercing, electrical, etc. These ammos can be found on the ground, purchased at vending machines, or crafted at U-Invents. Each enemy is vulnerable to different types of damage, so you can use an appropriate ammo against each enemy to make things go a little easier for you.
- REGULAR :: generic all-purpose ammo.
- ANTI-PERSONNEL :: designed for use against unarmored targets (i.e., the splicers).
- ARMOR PIERCING :: good against heavily armored targets like big daddies and turrets.
- EXPLOSIVE :: good against basically anything.
- ELECTRICAL :: good against electrical equipment like turrets, cameras, drones, etc.
- PROXIMITY MINE :: sticks to the ground and blows up when an enemy comes near.
- HEAT-SEEKING RPG :: tracks enemies with a heat signature, like splicers.
- NAPALM :: shoots fire. ‘Nuff said.
- LIQUID NITROGEN :: freezes enemies in place, letting you smash/melt them. They will thaw if you leave them for a few seconds though.
- STEEL BOLTS :: these standard bolts shot from the crossbow are unique because you can pick them up from walls and corpses and reuse them. They have a chance to break on every shot, but this can be reduced with a weapon upgrade available at Power to the People machines.
- INCENDIARY BOLTS:: light the target on fire when they hit.
- TRAP BOLTS :: lets you create the electrified trapwires you often see in Rapture. They embed themselves in the wall (or other object) and then shoot out the trapwire directly behind themselves until it makes contact with another object. Make sure you get out of the way before the trapwire fires or it will shock you. These trapwires do a large amount of electrical damage to the first enemy to walk through them.
Fights will end more in your favor when you use the correct type of ammo depending on the enemy. Against the easier splicers regular ammo will do the trick just fine. Big Daddies and other bosses will require the rare ammo (amor piercing, anti-personnel, etc.)
WEAPON UPGRADING
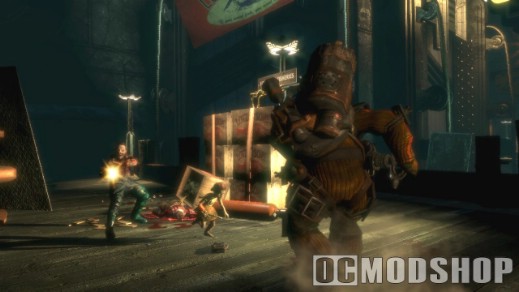
Weapons can be upgraded in various ways to increase their power, speed, or splash damage. The “Power to the People” machines offer these upgrades, and are scattered around Rapture. Each machine will do one upgrade to one of your weapons, free of charge, and then cease to function forever, so make sure you choose your upgrades wisely. Note that upgrades are permanent and will remain on your weapon for the rest of the game. The locations of the weapons upgrade machines are listed in the reference section of this guide.
PLASMIDS
Plasmids are a type of genetical modification to your body, which provide you with various powerups such as telekinesis, shooting fire or electricity, etc. Click on the LB to switch to Plasmid mode, and then use LB to cycle through your plasmid abilities. Pull the left trigger to use the selected ability. 
- ELECTROBOLT :: One of the most useful abilities in the game. It can be used to short out security systems, and unlock broken electronic doors. You can also stun splicers and Big Daddies, and fry anyone standing in water (which there is alot of in this game).
- TELEKINESIS :: Most useful against heavy projectiles like grenades and rockets. You can just grab them out of the air and throw them back. You can also grab items that are out of reach, like money. You can also grab trapwires out of the wall to disarm them. You can also hold corpses in front of you as a “meat shield”.
- INCINERATE :: Fire up the grill, Paw! Can also be used to light oil slicks, melt ice (which reveals hidden items and block your path).
- HYPNOTIZE BIG DADDY – This plasmid can ONLY be obtained from the care packages you get from Tenenbaum for rescuing little sisters.
You only have a certain number of slots in which you can equip your plasmids. Each time you gain a new plasmid you will be given the option to either place it in one of your slots, or store it in your gene bank for later use. You can visit a Gene Bank machine at any time to swap out your plasmids and gene tonics, free of charge. You’ll want to do this frequently to adapt your strategies to your enemy and situation. You can also purchase new plasmid slots from the Gatherer’s Garden machine, up to a maximum of six.
There are several ways to obtain new plasmids. You can occasionally find them on the ground in Rapture (they will look like glowing bottles with a colored liquid inside). You can also get them from researching enemies However, the most common way to get new plasmids is from the Gatherer’s Garden machines, which sell plasmids and other genetic upgrades. Purchasing from a Gatherer’s Garden requires ADAM, and the only way to get ADAM is from the Little Sisters.

GENE TONICS
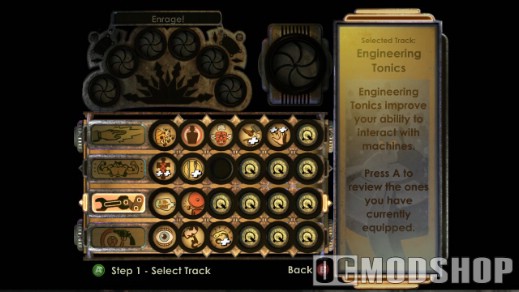
Gene tonics, like plasmids, are genetic modifications to your body. However, unlike plasmids, they provide passive effects which are always active and do not need to be triggered. There are three main types of gene tonics – physical, which provide things like damage resistances and increases to speed; engineering, which increase your hacking skills; and combat, which do things like increase your damage or skills with particular weapons.
- NATURAL CAMOUFLAGE :: One of the best tonics in the game. Makes you invisible if you stand still for more than a few seconds. Very useful for evading alarms, ambushing enemies, and just about everything else.
- DAMAGE RESEARCH :: Increases the bonus damage you gain from doing research on enemies. If you’ve been keeping up on your research, this greatly increases your damage output, especially if you get the upgraded version of this tonic.
- MEDICAL EXPERT :: Provides a large increase to the amount of damage your first aid kits heal. Very valuable for stretching your limited supply out.
- EVE LINK :: Restores EVE whenever you gain health from a first aid kit.
- WRENCH TONICS :: Greatly increase the damage you do with the wrench, and provide some other bonuses as well. Slotting all of these turns you into a melee machine, which is a very viable strategy when you’re running low on ammo.
- ELEMENTAL TONICS :: Electric Flesh, Human Inferno, and Frozen Field increase the elemental damage you deal and reduce the elemental damage you take. They are not terrible useful for most of the game, but they are crucial for the last boss fight, which is heavily elemental-based.
Inventing
You will eventually begin collecting random items with no apparent purpose, like rubber tubing, batteries, brass shell casings, etc. You can bring this junk to a U-invent machine and use it to craft more useful stuff like auto-hack tools and custom ammunition. This doesn’t cost you any money
Researching Enemies
Part of the plot requires you to obtain a research camera, which is then used to study your enemies. The camera is used just like a weapon – select it with RB and take a picture using RT. The camera uses film as “ammunition”, which can be obtained from vending machines, enemies, containers, and just lying around.
You research your enemies by taking photographs of them, which are then graded (much like Dead Rising). The more spectacular the shot, the greater the research points. Once you’ve “identified” how your enemies do what they do, you can then deal more damage to them, or mimic their behavior (you get a camoflage ability once you photograph enough Houdini splicers).
Keep photographing each subject until it doesn’t give you any more research increases, ESPECIALLY against the rarer enemies like Big Daddies and spider/houdini splicers. You can usually take 3-5 pictures of an enemy before the score gets so low that the picture won’t be taken.
Each enemy has 5 research levels – after you get to level 5 you won’t be able to take any more pictures of that enemy, since there’s nothing left to research. Usually levels 1, 3, and 5 provide damage increases against that enemy, while levels 2 and 4 provide more specialized bonuses.
Note that you can also research security camera elements like turrets, security cameras, and and bots. An easy way to do this is to zap them with electrobolt so they’re “stunned”, and then run in and grab a bunch of photos before they come online again.
SECURITY SYSTEM
Rapture has a security system which protects some of the more sensitive areas of the city. There are three major elements to the security system – cameras, turrets, and bots. All three of these elements can be researched with the camera. The security system can also be hacked so that it protects you and attacks your enemies. If you can prepare an area’s security system in advance for an important or difficult fight, it will make things much easier for you, since the turrets, cameras, and bots will be fighting FOR you, instead of against you. This is a good strategy to use against big daddies.

- CAMERAS :: security cameras can often be found scanning important areas of the city. You can see where the camera is looking because it emits a red circle of light on the area the camera is pointed at. If the camera sees you, the light will turn white, and you have a few seconds to get out of view. If you don’t, the camera will trigger an alarm, and security bots will be summoned to hunt you down. The alarm lasts for sixty seconds, but it can be cut short if you run away from the area where it was triggered or use a bot shutdown panel (see the Machines section). When the alarm is triggered, a red countdown timer appears on the right side of the screen to show you how much time is left.Cameras can either be avoided, destroyed (use explosive or armor-piercing ammo), or hacked. You can sometimes get close enough to hack a camera without it seeing you, but a better bet is to shock it with the electrobolt plasmid or electric ammo, which will temporarily put it out of commission. You can then get close enough to hack it without worrying about an alarm being triggered. Hacked security cameras will sound the alarm on enemies, and will summon allied security bots to attack them. An alarm timer will again appear, but this time it will be blue instead of red. Hacked cameras have a green light instead of a red one.
- TURRETS :: turrets are automated weapons platforms that attack you on sight. There are several different kinds, including machine gun, flamethrower, and rocket launcher varieties. Like cameras, they can be shocked with the electrobolt or electrical ammo and hacked, or else just outright destroyed. Hacked turrets have green lights instead of red, and attack your enemies instead of you.
- BOTS :: bots are summoned by camera alarms, and can occasionally be found lying on the ground. See the enemies section for more details on bots.
Hacking
BioShock includes a hacking mini-game, which allows you to (among other things) convert security system elements to your side, open safes and combination locks, reactivate bots, and reduce prices and increase stock at vending machines. You can usually hack items by walking up to them and pressing the X button. This brings up a screen which shows you the difficulty of hacking the item, and what you will get if you successfully hack it. Pressing A will take you to the hacking mini-game.
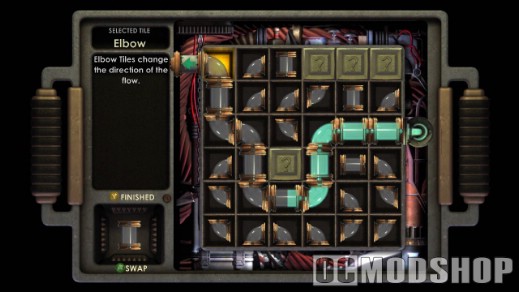
The hacking minigame is a “tile” game where you have to rearrange pipes to redirect a flow of water from a starting point to an ending point. At the beginning of the game, all the tiles are flipped over. Press A to flip over a tile, and press A again to swap the flipped tile with whatever you have in your “storage” or “buffer” (shown on the left side of the screen). This game is much easier on the PC version, as you are able to use a mouse.
Essentially you have to connect the starting point with the ending point before the blue energy flow gets to the end of the pipe or touches an alarm or overload tile. If the energy flow reaches the end of the pipe before you connect it to the end tile, the system will overload and you will take a small amount of damage.
- OVERLOAD TILES :: look like little orange explosions. If the energy gets routed to these tiles the device will automatically overload and you will take a large amount of damage.
- ALARM TILES :: look like little fire alarms with a red dot on them. If the energy gets routed to these tiles an alarm will go off and bots will be summoned.
- RESISTOR TILES :: look like zig-zag electrical resistors. These greatly slow the speed of the energy flow, and buy you a little extra time to complete the circuit if you’re having trouble.
- FAST FLOW TILES :: these are very thin pipes that show up late in the game. They are basically the opposite of resistor tiles, they speed up the energy flow instead of slowing it down. Try not to use them if you’re short on time.

